The translation process can be initiated in two ways:
- Request translation in CaptionHub - Allows users to request translations without needing access to Smartling. Users add a special tag to the content they wish to translate, and translation jobs are automatically created and authorized in Smartling.
- Request translation in Smartling - Allows users to request translations in bulk and customize job names. Users can choose to authorize translation jobs upon creation or manually authorize them later.
Request translation in CaptionHub
-
Navigate to the project you wish to translate in CaptionHub.
- Ensure your project has original (source) language captions.
-
Add the languages for which you want to generate translated subtitles.
- Click the Translations tab > Add translation button
- In the Add translations modal, under Translation method, select Manual. Then, choose the languages you want to translate into and click Add Translations.
Apply Limits To is a CaptionHub setting which controls which tracks in your project will have your CaptionHub limits applied.
- Click the Translations tab > Add translation button
-
Then, when you are ready to translate, add the tag
ready for translationto your project to trigger the creation of a translation job in Smartling.
- Once this tag is added the connector will create a new translation job in Smartling, using the project name along with the date and time [UTC] as the job name.
- If the request is successful, the connector will add the tag
smartling requestedand the notes field will show "Smartling: Project requested at [date] [time]."
The job is automatically authorized for translation in the default workflow for the language. If you prefer to review jobs before kicking off the translation process, please request translation in Smartling and choose the option Save for Later.
- If there is a problem with the request, the tag
smartling erroris added, and the notes section will display the reason for the error. To resolve this, first address the reason for the error then remove thesmartling errortag to re-trigger the translation request.
In the example above, the error message: "The project was not requested because the Smartling language configuration for [NL] is missing. Please configure languages and update project again." indicates that the target language Dutch [NL] is not mapped correctly in the Smartling Language Configuration. To resolve this issue, first complete the language mapping for Dutch, then remove the error to re-trigger the translation request.
How to resolve translation request errors
❌ Smartling error: The project was not requested because it does not contain a language in Translations. Please configure languages and update project again.
🔄 Fix: Click the Translations tab > Add Translation button. See Step 2.
❌ Smartling error: The project was not requested because the Smartling language configuration for [language code] is missing. Please configure languages and update project again.
🔄 Fix: From within your CaptionHub project, click on the Settings tab > CaptionHub Settings. Complete the language mapping for the locale, by selecting the appropriate language from the dropdown menu. See info on Language Configuration.
Request translation in Smartling
There are two ways to Request Translation in Smartling:
-
Select asset > Actions > Request Translation.
This option allows you to bulk-select multiple assets for translation.
-
Click the information icon for an asset > Request Translation.
This option allows you to request translation for a single asset.
Both methods will open the two-step Request Translation wizard:
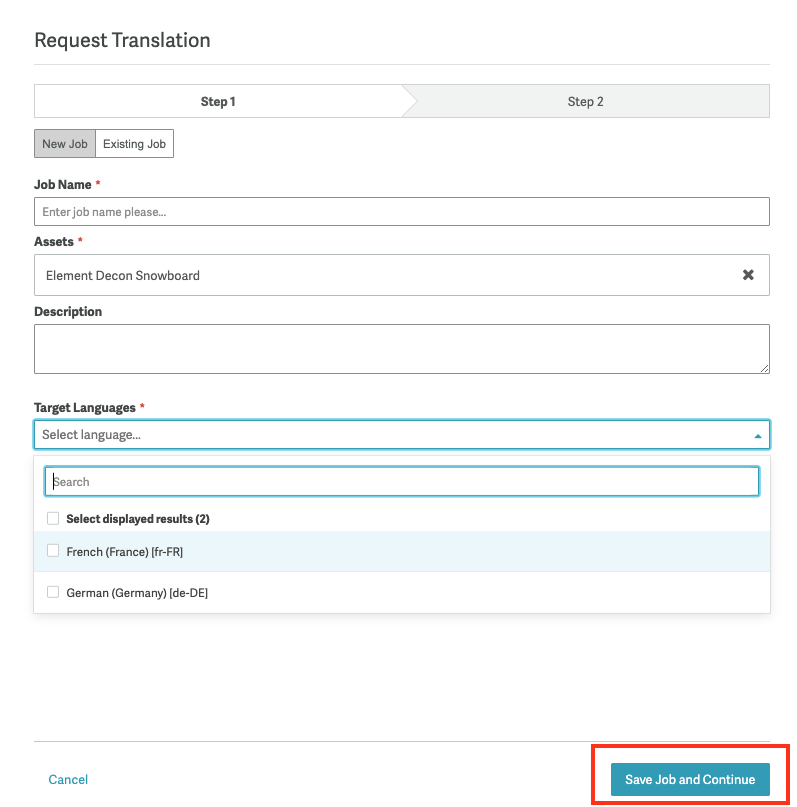
Step 1
- Choose to create a New Job or add the content to an Existing Job.
- Under Assets, ensure the assets selection is correct. Click the X to remove any asset listed.
- (Optional) Add a description for linguists.
- Select the Target Languages.
- Click Save Job and Continue to create the Job in Smartling.
Step 2
- Here you can see a cost estimate for the job based on your selected workflows.
- If you edit the workflow(s), the estimate will update automatically.
- (Optional) Add a Job Due Date.
- Select Save for Later, to create the job, but have the content sit in Awaiting Authorization. Select Authorize Job, to kick off the translation process.
We recommend selecting Save for Later, so you can review the strings in the job before authorizing it for translation.
Translation delivery to CaptionHub
The CaptionHub Connector is file-based, meaning translation progress is tracked at the file level rather than the job level. When you request a CaptionHub project for translation, the captions are bundled into a WebVTT file and sent to Smartling for translation. Once the file is fully translated for a target locale, the translations for that locale are automatically delivered back to CaptionHub.
You can also trigger translation delivery manually at any time. To export translated content:
- From your CaptionHub project, click the CaptionHub tab
- Select the assets you would like to export translations for
- Click the Actions menu > Export Translation
You can also manually export translations from the Asset Details page.
Check translation progress
You can check the translation status of any asset via the Asset Details page, by clicking the info icon next to an asset in the CaptionHub tab.
The Delivered column shows the date when translations were last delivered to CaptionHub. The state Completed means all content is translated and was successfully delivered back to CaptionHub. For more details on different states please see the info here [insert link].
Hover over the requested date to view the exact time the asset was requested and by whom. Similarly, hover over the delivered date to see the exact time the asset’s translations were delivered. If translations were requested from CaptionHub, the requester will be listed as service+captionhub-provider@smartling.com.
You can also track translation progress directly in CaptionHub. Navigate to your project, click the Translation tab, and check the Caption Progress column. The percentage indicator shows the translation progress, with 100% indicating that the captions are fully translated.
Viewing translations in CaptionHub
- Navigate to the project in CaptionHub.
- Select the Translations tab.
- Under the Language column, click on the target language.
- A side-by-side display will show both the source captions and the translations.
Content parsing
When a CaptionHub project is requested for translation, the captions are bundled into a WebVTT file and sent to Smartling for translation, regardless of the original subtitle file format used to upload the captions to CaptionHub.
All files are parsed using Enhanced Subtitle Parsing, meaning strings are segmented based on sentence markers rather than timestamp entries. This allows for translating captions using MT and effective translation memory leverage.
Adding or editing translations
Translations should not be added directly in CaptionHub, as the connector does not recognize translations added manually. If your team adds translations directly, they will be overwritten when the connector delivers translations.
If you need to edit translations after they have been delivered to CaptionHub, all edits should be made in Smartling. The connector does not track or recognize changes made directly in CaptionHub. Any edits made in CaptionHub will be overwritten the next time the connector delivers translations for the asset. To ensure changes are preserved, always make edits in Smartling.
Visual context
If you would like to add visual context for linguists, consider uploading the video file as context after requesting content for translation. Navigate to the Context tab of your CaptionHub project and click the button Upload Context. From there, you can upload your video file and match it with the subtitle file that was uploaded to the project by the connector.
For more details, see Add Video Context for Subtitle Translation. Video context is not automatically generated by the connector due to current limitations of the CaptionHub API.