This article explores best practices for IDML and INDD translation via file upload. If you are interested in integrating Adobe InDesign with Smartling, read our documentation on the Adobe InDesign Plugin.
Adobe InDesign is a desktop publishing and typesetting software application produced by Adobe Systems. Creating a document with formatting and layout optimized for multilingual publishing can help you save time and money. The steps recommended below aim to make content parsing more efficient when you upload your InDesign document to Smartling, and shorten post-translation efforts to reformat/reconstruct the document.
InDesign File Format
Smartling supports both files in the Adobe InDesign Document format (.indd) and in the Adobe InDesign Markup Language format (.idml).
Hard Return vs. Soft Return
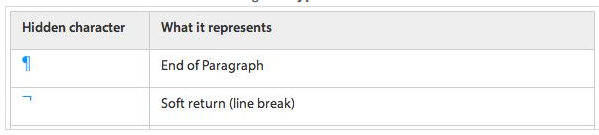
You will run into segmentation issues when you use a paragraph mark (hard return) instead of
a line break (soft return) to wrap a line.
To turn on "Show Hidden Characters", go to Type > Show Hidden Characters.
More on hidden/invisible characters in InDesign can be found here.
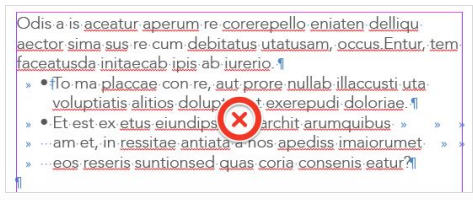
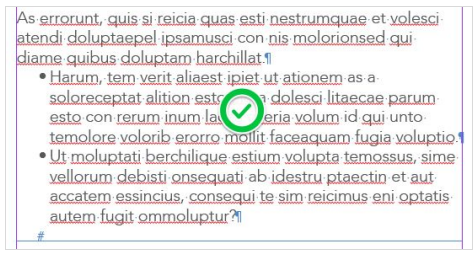
In this example, a hard return has been added to the end of each line. Each hard return will create a new string in Smartling, therefore, a Translator may be left to work on incomplete or unordered parts of sentences. A soft return will not alter your layout and will be parsed by Smartling as actual paragraphs.

“Threading” Multiple Text Frames
If you have multiple text frames that make up one sentence in your document, then consider “threading” them. They can then be parsed as one string in Smartling as opposed to showing numerous, often unnecessary, single strings, that will be difficult to translate.
More on threading text frames in InDesign can be found here.

Text from Linked Graphics Vs. Text Layers
Text belonging to a linked graphic is not included in the IDML Export. As a result, remember to localize the graphics as well as any text included in graphics, separately. In the example above, the text is included in the graphic and thus cannot be captured by Smartling.

A better alternative is the extensive use of layers. InDesign makes it easy to add layers, so instead of graphics with text, create a text box layered over your graphic. This can then be parsed and translated in Smartling.

Style Sheets
Consider using Character and Paragraph styles so that formatting is consistent throughout the
layout but is also preserved by Smartling when your translated file is downloaded. Manual format overrides are often lost by the application, which can substantially increase post-translation DTP time.
Furthermore, styles can be reused by any new file, saving you time and money each time a new document is created, especially true for projects with a large number of documents with a common layout.
Group Elements
When a group of inline elements (graphics and/or text boxes) should stay in fixed positions in
relation to one another, it's good practice to group them so that those objects maintain their
position when the translated text "moves" due to text expansion.
Proper Alignment
Using tabs and spaces to “align” lines of texts is another common mistake. It creates segmentation issues in Smartling, such as empty translation fields that are hard to manage for the translator and DTP team.
To align your text correctly, use Lists (bulleted list and/or numbered list), Paragraph Styles (left indent + first line left indent), and Special Characters (indent to here): Cmd (or ⌘) + \
Aligning with tabs and spaces
Using Lists to align your content
InDesign Tables Package
InDesign has a great tables package and yet very often we create tables from individual text frames delineated by manually drawn boxes and rules. When using the tables package, all cells/containers and rules adjust themselves automatically to accommodate text expansion from translation, whereas frames will need to be individually and manually resized during DTP.
Accommodating Language Expansion and Right-to-left Languages
Did you know that some languages, such as Russian, German, and Italian, can increase text length by up to 35%? One of the greatest challenges in designing InDesign documents for translation is creating a layout that allows for this expansion, with enough white space around text elements.
To prepare for content expansion, you can download a pseudo-translated file from the Smartling dashboard. Your DTP team can use this file to create templates or adjust layouts during the translation process.
For right-to-left (RTL) languages such as Arabic and Hebrew, Smartling automatically adjusts formatting to support RTL text. While this helps reduce the time and effort required by your DTP team to update text, paragraphs, and design elements, it does not eliminate the need for DTP. Final formatting adjustments are still necessary to ensure a polished final result.
Font Recommendations: Chinese, Japanese, and Korean (CJK)
Although every OS has a different set of fonts installed, you or your DTP team should use font sets with various weights (light, regular, bold, extra bold) and serif/sans-serif-compatible CJK font sets.
Here's what we think are safe choices for general use:
Simplified Chinese (or fonts with "SC" at the end)
Serif: Songti SC/Kaiti SC/SimSun
Sans-serif: Heiti SC/SimHei
Traditional Chinese (or fonts with "TC" at the end)
Serif: Songti TC
Sans-serif: Heiti TC
Japanese
Serif: Kozuka Mincho
Sans-serif: Kozuka Gothic
Korean
Serif: Apple Myungjo/Nanum Myungjo
Sans-serif: Apple Gothic/Nanum Gothic
Fonts listed above are available from Adobe InDesign, organized by languages, after Roman languages, in the order: (1) Japanese, (2) Traditional Chinese, (3) Simplified Chinese, (4) Korean

Turning Off Track Changes
Before you export your InDesign file to IDML, check that the Track Changes feature is turned OFF in InDesign. If the feature is on and the IDML file is uploaded to the Smartling Dashboard, it will cause segmentation issues:
Segmentation with Track Changes turned ON

Segmentation with Track Changes turned OFF

To turn Track Changes off, go to Type > Track Changes > Disable tracking in all stories. If Track Changes is currently active, make sure to select the Accept All Changes option to finalize the InDesign file before turning the feature off.
Alternatively, Accept all Changes
It is important to remember that, as mentioned above, this may increase the number of strings that the content snippets are divided into. Each separate change is treated as a standalone snippet. Hence, adding or removing something inside the text when this feature is on will split the snippet into multiple strings. You will not notice any difference in formatting.
If you require the tracking changes feature to be switched on, to avoid snippets being broken into multiple strings, you must accept/reject all changes inside the document before submitting it for translation.
File Versioning
To avoid issues with your content, ensure that each new version of the file has a unique naming convention. It is also important that the same file is not used in multiple Jobs.
Reduce the size of your INDD/IDML file
In very rare cases, you might find that your file size is larger than the size authorized for upload by Smartling. In this case, you'll need to downsize both the INDD and IDML file:
Go to Preferences > Display Performance and set the Default View, as well as the Adjust View settings to Fast.
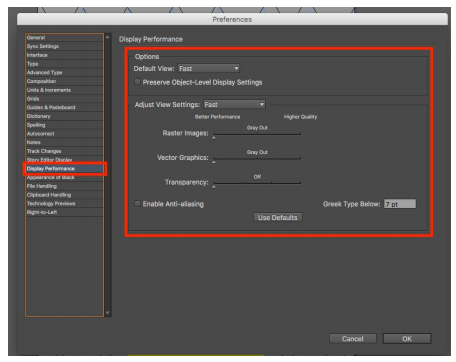
Then go to File Handling and uncheck Always Save Preview Images with Documents.

Once you’ve changed the Preferences Settings, save the INDD file and export it as an IDML. If you re-open the IDML file, you'll notice that images are displayed as grey boxes, reducing the IDML file size by as much as 95%.
To see the thumbnail images again, go back to preferences and revert both your Display Performance and File Handling settings.